Showing posts with label DIY. Show all posts

Wednesday, January 21, 2009

Put the power of the Obama campaign posters towards your own use...

Obamicon.ME and others
giving the power of the poster
to the people!

Like those really cool Obama campaign posters made by Shepard Fairey? Want to make one of your own?


You are in luck!

No Photoshop skills are required to make your very own Obama/Fairey style posters over at Obamicon.me. The site hosted by Paste Magazine allows you to upload any image (or use a web/phone cam) smaller than 4mb, and they will instantly turn it into Obama inspired pop art with the click of your mouse. How cool is that! Obamicon.me allows you to download your creations and post them in a gallery with everyone elses. Of course some photoshop skills will still come in handy as they recomend .png or .gif files with transparent backgrounds for the best effect.

Additionally there are a couple of other options available on the net.

Obamafy is a photo booth plug-in from Dubi Kaufmann and is available for download here: http://www.dubster.com/obamafy/ It is only available for Mac's OS X 10.5 Leopard, so PC users don't even think about it....

VECTORTUTS has a nice tutorial by Zach Wentz
Creating an inspirational political poster.
"This tutorial is inspired by Sheppard Fairey's famous political poster series for the Obama campaign in the US. We'll be showing you how to create this style of design. We'll start with basic image editing techniques in Photoshop to get our guide layers setup, and then we'll jump into Illustrator. You don't need any fancy equipment to do this. I used an older mouse that still has the rubber ball."

Finally University of Washington's in the studio blog gives some alternate advice based on the VECTORTUTS tutorial but with a little more thought about the art rather than just trying to automate the process. In How to emulate the iconic Obama poster, Part II Author DavidW notes "One detail that I noticed about Fairey’s poster was his use of both hard lines and curves. That is, Obama’s features aren’t exclusively represented with rounded shapes, nor exclusively sharp-edged shapes. There’s a mix. I think that mix really speaks both to Fairey’s artistic eye and ability to communicate such emotion with relatively little (just colors and shapes)." To this end he goes on to explain his process to achieving a successful Fairey/Obama style poster.

Flickr has one of the best collections of Obamicon and other Obama/Fairey inspired posters, here are a few...
PRIME by Joriel "Joz" Jimenez
support-our-troops by Lord Jim
HOPE
nude by KayVee.INC


And remember...

Please share this link, and let everyone know you found it here at: freephotostuff.blogspot.com

Thanks.


Monday, October 13, 2008

Live-View and Movie-Mode with any SLR

DIY Canon 5D mkII


From Carlos aka- Miami Fever over on Flickr. Perhaps this is Canon Inc's inspiration for including video into their new 5DmkII. Even if it isn't the idea is genius. Now all of us SLR users can reap the benefit of the live view and movie modes available in nearly all of today's point and shoots.

From Miami Fever's Flickr photostream:

"I would find myself having to put down the 5D when I wanted to shoot a video, and vice-versa.
It's really nice to be able to shoot a video of some subjects whose motion and sounds (such as cars) add interest as you photograph them.
I don't do this for street shooting, since discretion is key, the 5D is big enough as it is, and video wouldn't really be as interesting as a still.
This should work with any camera with a hot-shoe and any point and shoot with movie mode and a standard 1/4" tripod mount."

Carlos gives the details of the hardware used in his custom mount over at flickr where he goes by Miami Fever. Pay him a visit and let him know how much you like his creation! You can also compliment him on his amazing street photography taken on the streets of Miami. Most of his great images are what can be described as available dark, capturing the vibrant night scene in Miami without the use of a flash. It doesn't hurt that his images often include many of the beautiful women seemingly roaming the streets of Miami. You can also check out Carlos's blog: http://www.miami-fever.com/ where he posts additional photos and information about his photo documentary of life in Miami.

Carlos is also adept at converting all manner of lenses for use on his Canon 5D. Check out his flickr "Gear" set to see many of his lens adaptations. Additionally Carlos runs a photography and gear oriented blog: Ask Carlos where he elaborates and answers questions about photo equipment, lens compatibility, and his overall shooting technique.

And remember...

Please share this link, and let everyone know you found it here at: freephotostuff.blogspot.com

Thanks.

Sunday, September 21, 2008

DIY 120 SPAMera®


SPAMera®, originally uploaded by [ CK ].

Now you can have your camera and eat it too!

From Chris Keeney's Flickr page...

SPAMera®

This is my newest camera in my collection. It takes 120 roll film and yields 8-12 exposures. Made in my kitchen on 02.03.06. ~ 220 film compatible

Hormel // SPAM Museum // SPAM Family // SPAM History // The Art of SPAMography

more information about this camera at chriskeeney.com

Uploaded by [ CK ] on 6 Feb 06, 1.59AM PDT.

And remember...

Please share this link, and let everyone know you found it here at: freephotostuff.blogspot.com

Thanks.

Wednesday, August 13, 2008

Free Guide to lighting figures and products for photography


Good photography is good lighting!

A lot of people think that good lighting is expensive. Wrong. The best light source for photography is free!

This is a great tutorial (Figure on Cheap Lighting) on how to better show off your figures to other figure enthusiasts on the net by taking better photos of your collection to share.


This knowledge is shared on the HappySoda blog written by “super rats”. HappySoda is an anime and anime stuff fan blog. Blog topics include Anime DVDs, figurines, and other related things, such as conventions. Super Rats is an avid miniature figure photographer with a fantastic portfolio of beautiful shots. Super Rats shares many of his photos on flickr as well, - Flickr Sets

Super Rats shares his experience and tips for creating a mini indoor studio using common household items. The results he gets prove that good figure and product photography does not have to be expensive or rely on expensive equipment.

DIY Lighting- Figure on Cheap Lighting
Super Rats Gallery- Flickr Sets
HappySoda Blog- Anime stuff fan blog


And remember...

Please share this link, and let everyone know you found it here at: freephotostuff.blogspot.com

Thanks.

Wednesday, March 5, 2008

DIY Camera Lens


Teach an Old Camera
New Tricks!


(Photo: Zeiss Ikon on a Sony Alpha A100)


Make an old camera useful again. Many old film cameras and lenses can easily be adapted for use with todays Digital SLR's. The science for which cameras and lenses make good DSLR adaptations is simple. The lens needs to go from a thicker camera body to a thinner body (with the adapter thickness making up the difference).

If you transfer to a thicker body then the lens will only focus for a couple of feet like a macro lens and everything else beyond will be out of focus. An optical element (lens) can be fitted into an adapter to correct this but they 1.) are very hard to find 2.) are very expensive 3.) you lose some quality and perhaps 1 f-stop of speed.

Kimmo Kulovesi (who took the photo above) writes about his adaptation on Yahoo flickr:

Contessa Nettel Cocarette on the Sony DSLR A100

"A Contessa Nettel Cocarette camera attached to my Sony DSLR A100 by means of sticking an 11mm M42 extension tube to the rear port of the camera. The moving lens assembly allows infinity focus to be achieved, enabling the 105mm f/4.5 Carl Zeiss Tessar lens to be utilized with the DSLR. (Or indeed, almost any SLR capable of accepting M42 lenses either directly or with an adapter..."

"from 1923... it's about as sharp as any lens I have."

-Arkku from Flickr

Lens adaptations or hacks have been around for as long as there have been cameras. Since there has never been a agreed upon standard mount between manufactures there has always been the case of certain special lenses that photographers could not live without and were adapted over when the photographer changed or updated camera systems. Some lenses like the 1920's Kodak Pocket Folder lens have been considered so special for their soft focus portraiture that they have been sought out, and modified to work in modern portrait studios.

Loss of automation is something to consider if you do desire to do an adaptation. Today's DSLR wonder-cams have a lot of integration between the camera and the lens. Without a modern electronic lens attached you will lose some automation that we take for granted today. Some of the biggies include:

Autofocus

You will surely lose Autofocus and the ability of the camera to determine when the shot is in focus using the focusing points. You will have to twist the focus knob yourself and then eyeball the image in the viewfinder to determine if the focus is correct.

Creative Modes

You will be stuck using the camera set to manual "M" mode or (if you are lucky depending on the camera make) possibly Aperture priority, if your camera can still meter light properly without an electronic lens, (Sorry Nikon DSLR users you lose your lightmeter!)

Auto Diaphragm

Modern cameras allow you to meter and focus with the lens iris wide open, then as the shutter is pressed the lens automatically stops down to the preset opening just before the shutter fires. The reason for composing with the lens wide open is to give a brighter viewfinder and to ease in focusing. With an adapted lens you will need to set the lens iris manually before you press the shutter.

To the modern DSLR user the loss of automation alone can be daunting. For those of us that used film cameras it will be like stepping back in time. Either way it is surely more work to adapt and use a non system lens than to just buy one made for your camera. However for many of us Do-It-Yourselfers hours of enjoyment can be had by adapting and using these older lenses and cameras.

And remember...

Please share this link, and let everyone know you found it here at: freephotostuff.blogspot.com

Thanks.


Thursday, February 21, 2008

Free Paper Crafts from Canon


Canon 3D Papercraft

DIY paper wonders

Tired of printing out photos on your printer? Then give the fine art prints a rest and give your printer something fun to print. Canon’s free 3D Papercraft website provides hundreds of beautiful paper projects with detailed instructions that you can print out on your printer and assemble yourself.

Everything from simple Origami to complex structures like a detailed Taj Mahal are available free at the Canon Papercraft website.

Each Papercraft project is available as a downloadable PDF file.

Surprisingly there is no paper EOS 1D Mark III available yet! However Canon is constantly adding new paper wonders all the time.

And remember...

Please share this link, and let everyone know you found it here at: freephotostuff.blogspot.com

Thanks.

Wednesday, January 30, 2008

Do-it-yourself lightbox


Build Your Own Lightbox


A simple and quick article By Joseph Holst on putting together your own lightbox

Available from Ourmedia website. Enjoy!

Building a light box is easy.


And remember...

Please share this link, and let everyone know you found it here at: freephotostuff.blogspot.com

Thanks.

Build your own Macro Ring Light


DIY LED Macro Lite

From Brainerror.net : Build your own macro ring light

This is a tutorial on making a so-called macro ring-light and is intended for people who own a consumer type of digital camera with macro capabilities.

There are some macro flashes around, but they're very expensive and intended for SLR camera's not the consumer typed digital camera. Because the light comes from different angles the light is equally divided and the scene is perfectly lit.

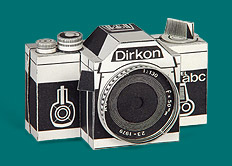
A fun project for do-it yourselfers, why not add one to your Dirkon homemade SLR.

And remember...

Please share this link, and let everyone know you found it here at: freephotostuff.blogspot.com

Thanks.

Saturday, January 5, 2008

Do It Yourself - SLR


Homebuilt SLR camera?

Sure why not.

The Domokon proves the concept.

Although the plans seem to be a bit vague, it looks like a fun project!


If you share this link please let everyone know you found it here at: freephotostuff.blogspot.com

Thanks.

DIRKON – THE PAPER CAMERA


Cut-Out paper pinhole cameras known as the Dirkon, published in 1979 in the (Communist Czechoslovakia) magazine ABC mladých techniků a přírodovědců [An ABC of Young Technicians and Natural Scientists].

Pinhole CZ maintains a website with the instructions for making the Dirkon camera which you can download in Adobe PDF format.

Find it here: http://www.pinhole.cz/en/pinholecameras/dirkon_01.html

If you share this link please let everyone know you found it here at: freephotostuff.blogspot.com

Thanks.

Free Lens Hoods... Part III

You do the math...

Finally thanks to The Great Pyramids, Igor Yefremov, and a little mat
h, we can now easily make our own lens hoods from scratch, on the go and in the field. Read his article How to make a simple lens hood, Recalling ancient pyramids.

One of the most important ways we can go about improving our photographs...

So still not convinced a lens hood is the thing for you? Then you must read Lens Hoods, over at vanwalree.com. It is an expert text on lens flare and the effects of different style hoods to combat it. It is simple to read and has lots of good visuals, don't miss it.

If you share this link please let everyone know you found it here at: freephotostuff.blogspot.com

Thanks.

Free Lens Hoods... Part II

Don't forget to Recycle...

Another great source for lens hoods is found in every day items around the house, namely plastic bottles.


About all it takes is some time and care and careful, slow going to cut the material appropriately and such that it fits properly. In this instance, the 40.5mm diameter of a typical Russky normal lens did not translate out perfectly to the diameter of the plastic bottle, and thus it was necessary to make the cut such that its slightly concave (as seen in the accompanying photo).


When fitted onto the lens, the plastic flexes slightly and exerts a bit more holding pressure than would naturally occur in a straightforward ‘press on’ fitting.


The now finished hood is painted a flat or matte black, and the job is complete. I consider this the “perfect” lens hood for one main reason: it didn’t cost anything but the few minutes work it took to make it.


To really finish it off you could use your PDF printout of a tulip petal-shaped hood to trim the front of the plastic bottle hood.


If you share this link please let everyone know you found it here at: freephotostuff.blogspot.com

Thanks.

Free Lens Hoods... Part I


Printable PDF documents to make your own lens hoods, Calculate your own hood in the field! & Plastic Bottle hoods too!

Lets face it many of us go without lens hoods when in fact they are one of the most important ways we can go about improving our photographs. The purpose of a lens hood is to prevent flare, which can seriously degrade the image quality of photographic lenses. This being said it is often the case that we do not get a lens hood when we purchase the lens, or often in my particular case, the size of the lens hood means it often gets left at home rather than on the camera.

Part I

Cut along the dotted line...

The folks at www.lenshoods.co.uk have completly and utterly obliterated any more lame excuses why the rest of us don't use a lens hood. First off they offer them for free! You hear that Canon & Nikon, and anyone else who charges upwards of $100 for a piece of round plastic. Second they are made from paper so size is no longer an issue, they will simply fold right up. These guys provide hoods in Adobe PDF files for most major manufactures (Canon, Nikon, Olympus, Pentax) and third party lens companies (Sigma, Tamron, Tokina) too. They also provide a service that lets you design your own. These guys even go farther than your manafactur often does, and offer conventional round hoods as well as tulip petal-shaped lens hoods with curved cutout notches. This tulip petal design maximizes the amount of hood coverage for the minimum amount of weight and hood area. Tulip-shaped hoods cannot be used on lenses with rotating ends though, because perfect hoods must be aligned to the sensor frame dimensions.

RegularJen blogged about how she was able to use the PDF lenshoods as templates to cut ones from black art foam: lens hoods on the cheap with bonus conversation.


If you share this link please let everyone know you found it here at: freephotostuff.blogspot.com

Thanks.


Label Cloud